 |
Ideally when modifying a Honda GX200 or similar engine you will want to install a performance header. The stock muffler pictured to the left is very restrictive and really has these engines choked down. A high flow header allows the engine to breathe and make power. However for some applications a header will not work. Some of our customers need to keep the stock exhaust due to clearance restrictions, or rules they are trying to follow for a certain class or for noise level purposes. In these situations we can modify the stock exhaust for better flow to create more power. |
 |
This takes some time and patience so we only recommend doing this if a free flowing header simply will not work and your stock exhaust is your only option. Start by removing the exhaust from the engine and remove the heat shield. |
 |
Once the heat shield has been removed you can start peeling back this lip that goes all the way around the muffler. We use a screwdriver to get things started. |
 |
We find the corners to be very difficult to peel back. We use a dremel to make a couple slit cuts which makes it much easier to open up the corners. |
 |
Here you can see we have the lip pulled up all the way around the muffler. |
 |
This welded round portion you see is a tube that goes through the muffler. That is a plug welded into the top of the tube and it's welded to the upper portion of our muffler. We need to grind down this weld so we can pull the muffler apart. |
 |
Here we've made some progress and you can see the line going around for the plug. We need to keep grinding though because the tube is still welded to the upper body of the muffler. |
 |
Now you can see the weld has been ground off exposing the tube and we've pulled the plug out of the tube as well. |
 |
Pulling the top cover off the muffler exposes this first baffle. On the lower portion of the baffle in this picture you can see the holes the exhaust gasses have to travel through. We're going to add more holes so the exhaust gasses can flow more freely. |
 |
Removing the first baffle exposes this second baffle. Once again you can see in the bottom right there are holes the exhaust gasses have to travel through. We're going to add more holes. That perforated tube is the spark arrestor. We're going to remove the spark arrestor for this application. |
 |
Now with the top cover removed and both baffles we can see the exhaust tube. The exhaust gasses enter the muffler via these two holes you see. From there they find their way through the baffles and exit the muffler. This is a genunie Honda muffler and these two holes are quite adequate for our needs with this muffler. Some of the clone mufflers we've opened up are more restrictive in which case we'll drill the holes larger and/or make additional holes. |
 |
Now our stock muffler is taken completely apart. We can start adding the holes to increase the flow of this stock muffler. |
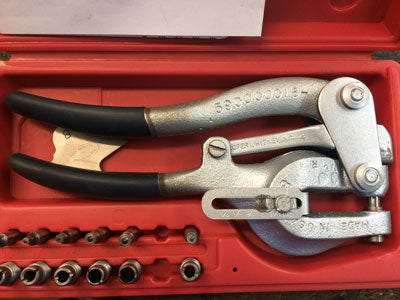 |
We're going to use this Roper Whitney tool which makes quick work of punching new holes. |
 |
If you compare this picture to a previous picture of the lower baffle you will see we've added several holes. |
 |
We added several holes to the second baffle and dropped it in place. |
 |
Now we've put the top cover back on the muffler and put the plug back in the tube. |
 |
Now we go around folding the lip back over. A pair of pliers works great for this job. |
 |
Now we welded up the tube and plug. This doesn't need to be pretty because it will be covered up by the heat shield so we just used a cheap mig welder. Just make sure there are no pin holes and you have it all sealed up. |
 |
We also put a spot weld on those slit cuts we made which will help hold our higher flowing muffler together. |
 |
We're going to clean up our muffler and spray some high temp paint on it. |
 |
Here's our modified stock muffler with a fresh coat of paint and installed on the engine. |
 |
The finished product with the heat shield back on. Our modified exhaust looks the same as it did before however now it flows much better allowing the engine to produce more power. We have gone a little crazier with opening up the passages for the exhaust gasses in previous mufflers we've worked on. It seems however if you get too crazy with the holes the exhaust can become loud and it tends to fall apart over time. The work you see performed in this article will cause the exhaust note to be a little louder than stock, the engine will generate more power and the muffler will hold up with no problem. |
 |
Just for fun we're going to do a test and use a decibel reader to see how our modified muffler compares to a stock muffler, a header with a Briggs style can muffler and an open header. |


