 |
First remove the following:
- Gas tank
- Muffler
- Valve cover
- Spark plug
- Air filter box
|
| Now you need to place the engine at top dead center (TDC). To do this, grab the crank where the clutch would mount and turn the engine over. You will see the valves open and close while you are turning the engine over. Look into the spark plug hole and turn the engine over until the piston is nearest the spark plug hole. This is TDC and you should notice that both valves are closed (the valve springs should not be compressed). |
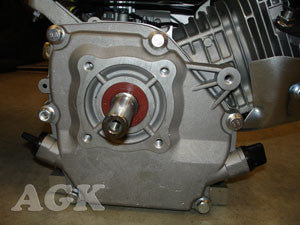 |
Now remove the engine side cover (the side where the clutch gets mounted). There are 6 bolts you will remove here. |
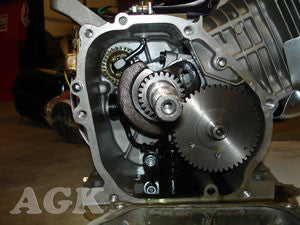 |
Side cover removed |
 |
Sometimes the cam and lifters will fall out when you take off the side cover. Do not worry, they go back in easily. |
 |
Now look into the back, upper left of the engine and you will see a plastic gear. This is what you are going to remove. You will also see a metal arm with an elbow in it coming from the top of the engine. You will need to remove this too. |
 |
Disconnect the linkage from the metal arm at the top of the engine. You can try to slide the metal arm down and out of the engine, but chances are it will hit the crank. Pull the metal arm up from the top of the engine until it stops and cut it with a hacksaw, dremel cutting wheel or bolt cutters. Now pull the remainder of the arm down and out of the engine. There is a washer on the arm. Make sure this washer also gets removed. This washer is sometimes stuck with grease at the top of the block. Look up there and make sure you get this washer. |
| With the metal arm out of the way, it's time to pull the plastic gear out. There is a plastic cap in front of the plastic gear that you can pull out with a pair of needle nose pliers. There is a thin, flat washer between this plastic cap and plastic gear. Make sure you get this washer so it doesn't end up loose in your engine. |
| Grab the plastic gear with a large pair of pliers or vice grips and pull the gear off. Note: the plastic gear is held on with a small clip ring so it takes a bit of force to pull off the gear. You can also use a thin flathead screwdriver and a hammer to dislodge or bend the clip ring making it easier to remove the gear. Make sure you find the metal clip ring and remove it from the motor. There is another flat washer behind the gear. Make sure you get that too! (For those who are removing the flywheel, it's much easier to tap out the shaft the governor gear rides on from the flywheel side. Everything will easily fall out if you tap the shaft out. You will need to plug the remaining hole with a 1/4-20 bolt.) |
 |
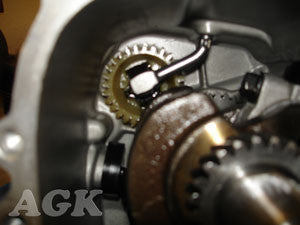
With this garbage out of your engine, you can plug the hole on the top of your engine case where the metal arm was. A 1/4"-20 bolt works very well. The aluminum is soft so if you don't have a tap/die set you can simply thread the bolt in the hole and it will actually thread the hole. |
 |
Governor arms removed and hole plugged |
 |
If using a billet rod, you will also need to remove the low oil sensor. Remove the sensor and plug the hole with a 3/8" x 1 bolt and copper washer. If you are not using a billet rod you should still remove this low oil sensor. If left in place, when you drive around corners, the oil will flow to one side of the engine and the sensor will shut the engine down. |
 |
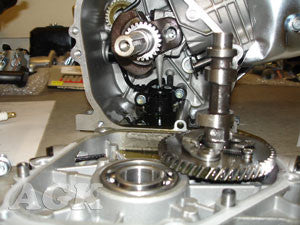
Now it's time to start putting your engine back together. If your push rods fell out during the governor removal process, slide them back into place. Make sure they contact the rocker arms correctly in the rocker arm dimple. Now slide the lifters into place. Nothing complicated here. Just slide the lifters into their holes and they will contact the push rods. Now you want to slide the cam into place. Make sure the lifters are now riding on top of the cam lobes. |
 |
It's very important to have the cam and crank gears aligned properly. You will see a round, dimple punch mark on the cam gear and crank gear. These dimple marks need to match up when the two gears mesh together. |
| After everything is lined up check to make sure the inside of the engine case is clean. Check the push rods and make sure they are making contact with the rocker arms in the correct location. Now bolt up the side cover. If the engine is new you can re-use your gasket. If the engine is used you will want to replace the gasket. Use a torque wrench and tighten the bolts in a crisscross pattern to 17ft.-lbs. |
| With the engine side cover bolted back on, turn the engine over and watch the valves as they open and close to make sure everything is operating smoothly. Now you need to set the valve lash. If you plan to upgrade to stiffer valve springs, this is a perfect time to do that. |
| Make sure the piston is at TDC on the compression stroke. |
 |
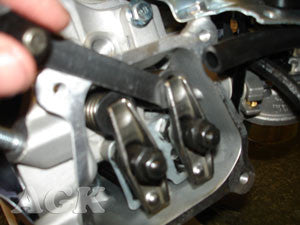
Slide the rocker arms off of the valves and turn them to the side. You do not need to remove the rocker arms. Just turn them to the side. Use a length of rope to stuff into the combustion chamber with as much rope as you can push in there. This will prevent the valves from dropping into the chamber. |
| Push the valve spring and retainer down and position them so you can slide them up, off the tip of the valve. Now replace the stock valve springs with stiffer valve springs. We use 18lb valve springs with stock cams, 22lb valve springs with mild cams up to .265" lift and 26lb springs with high performance cams. Slide the rocker arms back over the valves. Remove the rope from the chamber. |
 |
Now you need to use a feeler gauge to set the valve lash. This is the distance between the rocker arm and the valve tip. Make sure your engine is still set at top dead center before setting the valve lash. We set our valve lash at 0.004" intake and 0.004" exhaust. Be sure you don't accidentally set the lash too tight (such as zero lash) or you will break parts. After the valve lash has been set, turn the engine over a few times and recheck. When everything checks out okay, you can put the valve cover back on. |
 |
Now you can remove all of the original throttle linkage and springs that used to be connected to the governor. You can either create your own throttle linkage with various parts you may have around your garage or purchase our throttle linkage kit p/n 18190. |
| Now you can replace the tank, muffler, spark plug and air filter box. |
| We hope our instructions were helpful. Don't forget to put oil in your engine before starting it. Have fun with your extra power! |


