File Fit Rings
| Using file fit rings allows you to control the ring end gap. Our file fit rings will work on a piston for a standard bore. The rings are oversized so they can be custom fit for the cylinder. If the ring end gap is too large, combustion gasses will escape into the crank case resulting in lost power. If the end gap is too small, the ends of the rings will touch when the engine heats up resulting in scored cylinder walls and lots of other problems you don't want. | |
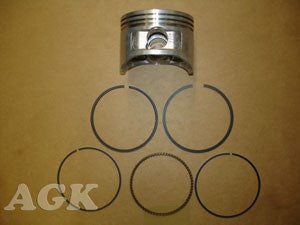 |
A set of rings consist of five different rings. Two thick rings, two thin rings and a corrugated ring.
|
 |
Filing the rings is a pretty simple process. Using a smooth flat file clamped in a vice helps simplify the job. Ring filing must always be done with the outer ring edge as the leading edge. In other words, always file by moving the ring right to left as in the photo. Having the outer face of the ring as the leading edge reduces the chance of chipping the protective coating on the rings outer surface. We only file one side of the rings and do your best to keep it square when the two ends are squeezed together. After a few passes on the file, take the ring back to the engine block and check for fit. |
 |
Knowing that setting the ring evenly in the cylinder is very important in getting an accurate end gap measurement, you can use your old piston and ring assembly as a tool. We removed the top ring from the stock piston so the second ring could be used as a depth guide. With the piston up side down, you can push the new ring into the cylinder until the second ring on the piston is resting flush on top of the cylinder. |
 |
This allows the file fit ring to be level inside the cylinder for accurate measuring. |
 |
Once the piston ring is properly set in the cylinder, a feeler gauge is used to measure the rind end gap. We set our end gap at 0.004". After a few trips back and forth to the file, you should get a good feel for how much material is removed with each pass on the file. It may take several trips back and forth until you reach the desired end gap, but work steady and be careful not to file too much. You can gap the the two thin oil rings a little larger (about .008") which will reduce the amount of friction they have against the cylinder wall. When all of the rings have been gapped and are ready to be installed, we start with an oil ring in the bottom slot of the piston. Next we install the corrugated ring on top of the oil ring. You can use a pair of wire cutters to snip the corrugated ring to size. Now we install the second oil ring on top of the corrugated ring so the corrugated ring ends up being sandwiched between the oil rings. It's a tight fit, but with a little patience you will be able to work the rings into place. Now compare the two thick rings and notice that one is all black (scraper ring) and the other has a shiny chrome edge (compression ring). Install the black ring into the center slot on the piston. Install the compression ring in the top position on the piston. |
|
Note: Inspect the rings for any markings near the end gap. Rings are always installed with their markings face up. If there are no markings, it doesn't matter which way they are installed. The positioning of the end gap on each ring is very important. |
|