 |
There is a large amount of horsepower to be found in a properly tuned carburetor. Unfortunately, there isn't a universal setup that will work with every engine combination. Jetting that works great with one engine may not work so well with another. |
| Armed with an assortment of jets and a free afternoon, we are confident you can tune your Mikuni for optimum performance. When we tuned our Mikuni we tried about ten different main jets, five pilot jets and every clip position on the needle jet. Our testing resulted in this final setup: 130 main jet, 12.5 pilot jet, needle clip in the center position and air screw two turns out (stock position). If you copy our setup you may or may not see great results. We recommend reading the tuning manual and trying different setups in order to achieve the biggest horsepower gains from this performance carburetor. |
| Tips: Our 22mm Mikunis come with a 95 or 100 main jet and 15 pilot jet. Bolt the carburetor up and run it for a couple laps with this setup. Pull the spark plug and take a reading. Chances are the plug will be white, indicating a lean condition. Start your tuning process by going to a larger main jet. Run a few more laps at a racing pace and check the plug again. Repeat this process until you get a good tannish brown plug reading. Remember to shut the engine down immediately when you pull to a stop, without letting the engine idle, to ensure you get an accurate plug reading. |
| After you find the desired main jet, you can move on to the other carburetor adjustments. Take note as to how your engine performs in all areas of the track. If there is a part of the power band you would like to tweak a little more, use the tuning manual to determine which jet controls that area of the power band. Experiment with different jet sizes until the desired performance is achieved. |
| With our Mikuni dialed in, our engine feels like an entirely different beast. The tedious work of changing jets between numerous test laps was well worth the improvement in top end power, low end grunt and smooth throttle response. Good luck! |
 |
The air screw is located on the bottom of the carburetor. The air screw can be adjusted using a flat blade screw driver. Our air screw is set at two turns out which is the stock setting. |
 |
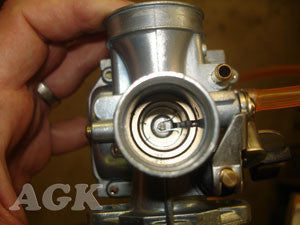
To access the main jet and pilot jet you need to remove the bowl. With a Philips screwdriver remove the 4 screws. |
 |
Once you pull the bowl off you will see the main jet (the large round brass jet in this picture) and the pilot jet (the smaller round brass jet just above the main jet). |
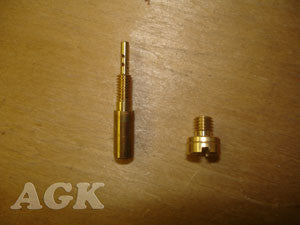 |
The two brass jets pictured here are the main jet and pilot jet. The main jet is the large round one. Each jet can be removed with a flat blade screw driver. |
 |
To adjust the jet needle position you need to unscrew the top of the carburetor. Be careful as you take the cap off because there is a spring inside. |
 |
Once you remove the cap and spring you will see the slide inside the carb. Reach in with your index finger and pull the slide out. |
 |
Here is what you have taken out so far. |
 |
Push the jet needle out of the slide. You will see five notches in the top of the needle where the clip can be adjusted. Putting the clip in the bottom notch would be the richest setting and the top notch would be the leanest setting. We put the clip in the middle for baseline testing and go from there. |
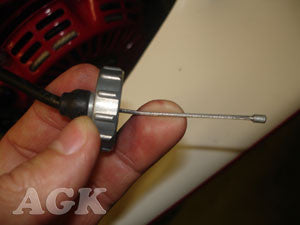 |
To setup your throttle cable, insert the throttle cable into the top of the carburetor cap. The rubber boot on the cap will hold the cable in place. Your cable will need a lead ball or barrel on the end of the cable wire. |
 |
If your cable does not have a lead ball or barrel on the end you can solder on a cable fitting p/n 16430. You want to set this up so there is about 2-1/4" to 2-1/2" (the one's we've done have varied on this measurement) of cable between the cable fitting and the underside of the cap. Also, don't let too much cable or solder stick out beyond the cable fitting because it can bottom out on the carb body keeping the slide slightly open. |
 |
Thread the cable wire through the center of the spring. Compress the spring with one hand and expose the lead barrel on the end of the cable wire. Insert the lead barrel into the bottom of the slide and run the wire up the notch on the side of the slide, all the way to the top. |
 |
Release the spring pressure and the throttle cable will hold everything together. Now you can insert the slide into the carb, compress the spring and screw the cap back on. |
| Before you start your engine you should test the throttle. Depress the throttle pedal a few times and listen for the slide opening and closing inside the carburetor. If you installed it correctly you will hear the slide open and close. If you don't hear the slide moving as you are working the throttle pedal, you may have assembled it incorrectly. Remove the cap and make sure the slide is not stuck in the wide open throttle position. |
| SPARK PLUG READING CHART |
 |
Tannish brown, good reading |
 |
Black, too rich |
 |
White, too lean |


