DIY Curved Manifold
|
For some applications, our upgraded carburetor/manifold combination cannot be installed due to clearance issues. On race karts the carb or air filter may hit the right rear tire. On barstool racers the carb may hit the foot rest on the barstool. We offer this solution for the do-it-yourselfer. This article was written several years ago. We now offer a curved manifold (p/n 12372). This information may still be helpful if you are looking to relocate the carb in a place where our curved manifold does not work. We do have an inexpensive manifold that can be used for this DIY process (p/n 24300) |
|
 |
You will need:
|
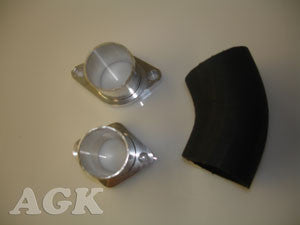 |
Cut the manifold in half. A band saw or hack saw works great for this. Cut out the section of radiator hose you plan to use. |
 |
|
 |
We install a support brace from one of the carburetor bolts, down to a shroud bolt to reduce vibration. This isn't necessary if the length of the manifold is very short. If the hose is more than a few inches long you'll find a brace is needed to stabilize the carb. (Not sure why we have a solid steel manifold pictured here with the brace.) |
 |
Complete setup installed. |
 |
AGK customer Tim Armstrong built an excellent version of the DIY curved manifold. The following information was provided by Tim. |
 |
Cut in half AGK carburetor adaptor with pulse fitting. Purchased Car Quest radiator hose part number 20661. Cut out tight 45 degree section of hose.. |
 |
Used 1/8" x 1/2" flat steel for support bracket. One bracket is secured at the carb bolt on one end and at a fan shroud bolt at the other end. |
 |
The second bracket secures the first bracket to the cylinder head for extra rigidity. |
 |
Allen bolts were used to secure the flanges to the cylinder head and carburetor. Notice there is plenty of clearance between the carb and right rear tire. |
 |
Keeping the curved hose as short as possible helps prevent vibration and keeps the hose from collapsing due to vacuum from the piston. |
 |
The completed curved manifold has the carburetor pointing straight back behind the engine. |
 |
Started 1st pull ran and idled very nice. Left 22 mm Mikuni stock for a few laps to see what it felt like. Plug showed it was lean, almost white. Placed the needle jet in the middle slot and went to a 120 main jet. This adjustment made the kart come to life. Checked plug after running and still a little lean so went to a 125 main and that is where it is now and runs great. Air mixture at 2 turns out. I am very happy with the performance, thank you Tim Armstrong... |
 |
Making a DIY curved manifold and turning the carburetor forward instead of back has proven to be a good idea. The longer piece of radiator hose requires a flexible coil spring on the inside so it does not collapse. These long manifolds make great power and they get cold with condensation dripping from them like a tunnel ram. With the air filter pointing forward there is also a ram air effect. This carb has a short brace that comes off of the fan shroud and goes to the carb flange. A good brace is important and the coil spring inside the radiator hose is important (especially when the manifold is this long). |
 |
Keeping the curved hose as short as possible helps prevent vibration and keeps the hose from collapsing due to vacuum from the piston. If you run into these issues due to a long manifold length, support the carb and install a coil spring in the hose to prevent it from collapsing. |